
Guides
Die-Lines 101: How To Read and Request a Packaging Die-Line
By editoruser · August 7, 2026
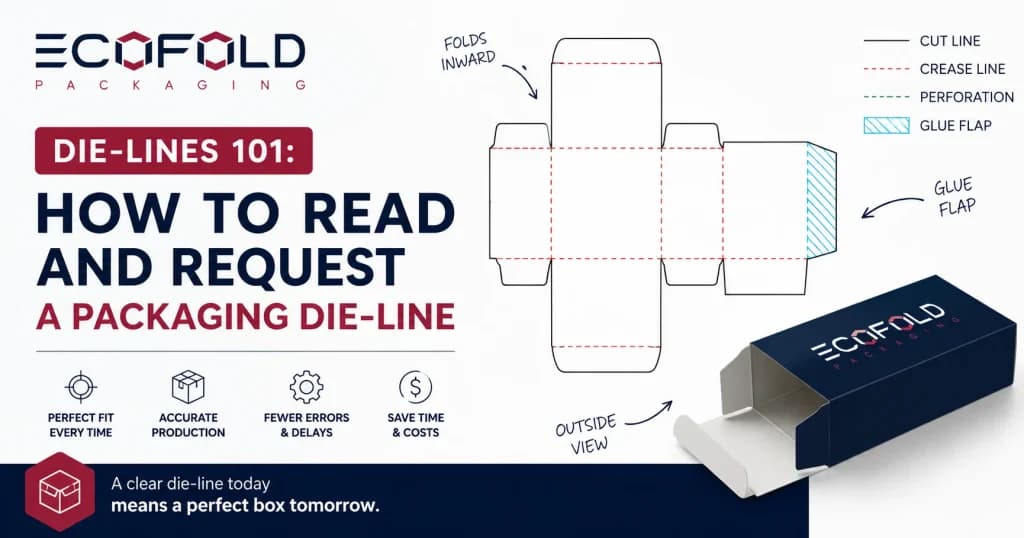
Most brands ordering custom packaging for the first time receive a packaging die-line from their supplier and have no idea what to do with it. The file arrives as an Adobe Illustrator document with colored lines crossing in multiple directions, overlapping panels, and areas labeled with instructions that feel like a different language.
Once the basic framework is clear, it is straightforward. But it uses a specific set of terms that every brand working with custom packaging needs to understand before sending the file to a designer or attempting to place artwork on it directly.
What a Packaging Die-Line Actually Is
A packaging dieline is a flat, technical drawing of a box or packaging structure as it would appear before it is cut, folded, and assembled. It shows the entire box as a single flat sheet, with all the panels unfolded and laid out across a two-dimensional surface.
The colored lines on the die-line are not part of the printed design. They are production guidelines that tell the print shop where to cut the material, where to score and fold it, and where to apply adhesive.
Think of it as the architectural blueprint for the box. Every box style has its own die-line construction: a tuck-end carton unfolds differently from a two-piece rigid box, a self-locking mailer has a completely different fold sequence from a pillow box.
No custom box gets produced accurately without an exact die-line used as the base template for the artwork. The die-line comes from the packaging manufacturer or a structural packaging designer, and it is prepared based on the box style, internal dimensions, and board material specified for the order.
The Five Elements Every Die-Line Contains
Every standard box die-line template uses a consistent set of markings to communicate production instructions. Learning what each marking means makes the whole document readable.
Cut lines (knife lines) mark exactly where the box will be cut from the flat sheet. Usually shown as a solid line in a distinct non-printing color, often pink or magenta. The cut line is the physical edge of the finished box after production.
Fold lines (score lines) mark where the box will be creased and folded into its three-dimensional shape. Usually shown as a dashed line. Fold lines appear wherever two panels of the box meet at an edge.
Bleed area is a zone extending beyond the cut line, typically 3mm (approximately 1/8 inch). Any artwork or background color that should reach the edge of the finished box must extend into the bleed. Small variations in cutting are a normal part of production, and the bleed zone compensates for them. Artwork that stops at the cut line without a bleed will produce a thin white paper edge on one or more sides of the finished box.
Safe area (safe zone) is an inner boundary, typically 3mm inside the cut line. All critical content, including brand name, product name, key text, and logos, should stay within the safe area. Anything placed between the safe area and the cut line is at risk of being trimmed off during cutting or ending up uncomfortably close to a folded edge.
Glue tabs are the areas or panels that will be folded over and bonded to form the box structure. Any artwork placed in glue tab zones will be hidden on the inside of the assembled box. Understanding where the glue tabs are before designing prevents a brand from placing a logo in a location no customer will ever see.
How to Read a Die-Line Before Placing Artwork
When opening a packaging die-line template for the first time, the best approach is to identify the front panel first. Most die-lines label each panel: Front, Back, Left Side, Right Side, Top, and the various Bottom Flaps. Once the front panel is located, the layout makes physical sense because every adjacent panel folds from the front panel out.
The die-line layer should always remain locked and separate from the design. Designers work on layers above the die-line, using it purely as a positioning guide. When the finished artwork file is submitted to the manufacturer for production, the die-line layer is typically kept in the file so the print shop can align the artwork against the cut and fold lines to verify accuracy.
Brands that are choosing a box style before requesting a die-line can review standard folding carton options in our Custom Retail Boxes range for the tuck-end, auto-bottom, and sleeve constructions commonly used in retail packaging programs.
Common Mistakes Brands Make When Working With Die-Lines
Several errors appear consistently in artwork submitted by brands new to working with die-lines. Most of them are avoidable with a basic understanding of the document.
Artwork not extended into the bleed. When background colors or images stop at the trim line instead of extending 3mm beyond it, cutting produces a thin white edge along one or more sides. Every background element must reach the outer bleed boundary.
Critical content placed too close to fold lines. Text or logos positioned on or near a score line end up folded in the assembled box, making them partially or fully invisible from the outside. Key design elements should stay at least 5mm away from any fold line.
Using RGB instead of CMYK color mode. Packaging production uses CMYK, not RGB. An artwork file prepared in RGB may look correct on screen but will produce unexpected color shifts in the final print. Color mode must be set to CMYK before artwork is submitted.
Building artwork without the die-line layer locked. Designing directly on the die-line layer causes the production guidelines to be treated as artwork elements, which creates confusion in the print shop and often requires a file correction.
Each of these errors leads to revision requests and reprints, which add cost and delay to the packaging order. Our guide on the Real Cost of Custom Packaging covers how artwork and specification decisions affect the total cost of a custom packaging run.
How to Request a Die-Line From Your Packaging Supplier
Requesting a die-line is straightforward when the right information is ready to provide. A packaging supplier or structural designer needs four things to produce an accurate custom box die-line:
- Box style: the specific construction needed (straight tuck-end, reverse tuck, auto-lock bottom, mailer, two-piece rigid, and so on)
- Internal dimensions: length, width, and depth measured from the inside, not the outside, since the product sits inside the box
- Board material and thickness: the material spec affects how the score lines are positioned relative to the fold
- File format preference: Adobe Illustrator (.ai), layered PDF, or EPS depending on the designer’s software
Providing clear dimensions upfront prevents the supplier from producing a die-line that requires revision before artwork can start. If the box style is undecided, reviewing the structural options first helps narrow the specification before the die-line request is made.
Die-Line vs. Packaging Mockup: Two Different Documents
A die-line and a packaging mockup are commonly confused, but they are not interchangeable.
A die-line is a flat production document. It defines where the box gets cut, folded, and glued, and it is used by the designer to place artwork accurately and by the manufacturer to produce the box correctly.
A packaging mockup is a three-dimensional rendered visualization of how the assembled and printed box will look. It is used for brand review, client approval, and presentation purposes. It does not contain any production specifications.
A mockup cannot replace a die-line for production purposes. Artwork that is built visually without a die-line reference almost always requires adjustment before it translates correctly to the physical box. Both documents are useful, but they perform entirely different functions in the packaging workflow.
File Formats Used for Packaging Die-Lines
The three file formats used most widely for packaging die-cut templates and die-lines are:
Adobe Illustrator (.ai): The industry standard. The die-line lives on a locked, separate layer. The designer adds artwork layers above it. This format preserves full vector quality for both the die-line markings and the artwork.
PDF (layered): Used when the design team does not work in Illustrator. A layered PDF allows the die-line to remain as a reference while artwork is built on top. Print-ready PDF is also the most common final submission format.
EPS: An older format still used by some packaging manufacturers and structural designers, particularly for die-cut template files in manufacturing and cutting software.
All artwork files submitted for packaging production should be in CMYK color mode, with a minimum resolution of 300 dpi for any raster (photographic) elements at print size, and all fonts converted to outlined paths to prevent font substitution errors during production.
For brands thinking carefully about how color decisions in the artwork interact with the printed result, our guide on Packaging Colors That Sell explains how material surface and color selection affect the final print output.
Starting With the Die-Line, Not After the Design
A die-line removes guesswork from the artwork process. A box designed without one is being built by approximation, and approximation in packaging production almost always means at least one revision cycle. Requesting the die-line as the very first step, before any creative work starts, is the single most effective way to get a custom packaging order right on the first print run.
Suppliers who specialize in custom packaging can provide die-line templates for any box style in their range, typically at no additional charge as part of the ordering process. If a particular box style is new or requires structural engineering outside standard formats, a structural designer will produce the die-line based on the specified dimensions and material.
Frequently Asked Questions
What is a packaging die line?
A packaging die-line is a flat technical drawing of a box showing all cut lines, fold lines, bleed areas, safe zones, and glue tabs. It serves as the production blueprint that guides the designer placing artwork and the manufacturer cutting and folding the finished box.
What information does a packaging die line include?
Cut lines showing where the box will be trimmed, fold and score lines showing where it will bend, a bleed area extending 3mm beyond the cut lines, a safe zone 3mm inside the cut lines for critical content, and glue tab areas indicating where adhesive will be applied.
How do I request a die line for custom packaging?
Provide the box style, internal dimensions (length x width x depth), board material and thickness, and preferred file format (AI, PDF, or EPS). The packaging supplier or structural designer will produce the die-line based on these specifications.
What is the difference between a die line and a packaging mockup?
A die-line is a flat production document used to guide artwork placement and manufacturing. A mockup is a 3D rendered preview showing how the assembled box will look. Both serve different purposes and neither can replace the other in a proper production workflow.
Which file formats are used for packaging die lines?
Adobe Illustrator (.ai) is the most widely used, followed by layered PDF and EPS. All production-ready artwork files should be in CMYK color mode with fonts outlined and raster elements at 300 dpi minimum.